This post covers how to turn your RaspberryPi into a remote multimedia station for both downloading and remote accessing downloaded files.
Foreword
Since many years I am using JDownloader as the solution to download things on all my computers. The problem with it is though that the files are not synchronized between them. Thus I cannot access what I downloaded from any machine different from the original downloader. This problem worsens even with the fact that once I am not at home, I cannot access the harddrives the multimedia is on.
What bugs me about JDownloader though is that there is no CLI application nor a WebUI, unless you want to rely on their external MyJDownloader service. But I wanted to find a way that enables me to run JDownloader on a headless RaspberryPi. The JDownloader should be accessible via browser, yet selfhosted.
Prerequisites
I only tested this on a RaspberryPi 4 with 8 GB of RAM running Ubuntu Server 21.04. It could be that the Raspbery Pi 3 is too weak for this, but feel free to give it a try. Therefore I assume you are running on a Debian based distribution. All not-containerized programs we need to build the multimedia station is Docker and ZeroTier.
Installation of Prerequisites
To build this setup, we are using
- Docker
- ZeroTier
- MisterDerpie/jdownloader-docker
- Docker-Apache/httpd.
We need to install Docker and ZeroTier (the latter needs to be set up) before starting, the other two components will be touched later on.
Docker
Installing Docker on the RaspberryPi is straightforward.
1
curl https://get.docker.com/ | sh
After the installation, you need to be add your user to the docker group.
1
sudo usermod -aG docker $USER
Once this is done, reboot or logout and login. Verify that the installation was successful by running hello-world.
1
docker container run --rm hello-world
ZeroTier
This section describes how to setup ZeroTier on the RaspberryPi. This is solely for accessing it from anywhere. In case you don’t want to access the Pi from outside the same network which it is running in, you can skip this section. The IP address will then be your Pi’s local IP address.
As straightforward as it is to install Docker, the same it is for ZeroTier. Yet we need more steps to do it.
Create ZeroTier Account
Go to ZeroTier.com and click on Sign Up to create an account. It is free and you don’t need any premium plan.
Create a ZeroTier Network
On the same page, go to Log In. After logging in, you should be redirected to my.zerotier.com. Click on Create Network.

You should see a table with the new created network.

Click anywhere on the row to go to the network configuration. The network can be named as you want. Important: Ensure that it is marked as private.

This will prevent any other user who may guess your network ID from being able to access it directly. Scroll down to the Advanced section and select any of the auto-assign IP addresses from the range in the lowest row. I selected 192.168.195.*, so this tutorial will continue assuming you’re in the same range.

If you scroll further to the Members section, you should see that no devices have joined this network yet.
Join ZeroTier Network with Raspberry Pi
To join a network, we need the network ID. This can be found in the yellow box stating No devices have joined in a way of join <NetworkId>. You can join via zerotier-cli command. My networkid is a84ac5c10a0a436f, so I run the following.
1
sudo zerotier-cli join a84ac5c10a0a436f
When the command ran successful, the console output should be 200 join OK. After some seconds you should be able to see the first member in the Members box.

To get it assigned an IP address in the virtual ZeroTier network, we need to check the Auth? box. Unless you check this, the device will not be part of this network and cannot communicate with others. I also recommend you to give it a name, for example RaspberryPi.
We are done. ZeroTier is set up and installed on our RaspberryPi. As the yellow box warns us, there should be at least two devices. Of course, the other devices should be the hostmachines we want to access the RPi from.
Join ZeroTier Network from another machine
Linux
In case your host machine is a Debian based Linux machine, you can install ZeroTier the very same as done for the RaspberryPi. The only step you need to do after installation is joining the previously created network.
Windows
On Windows, download the ZeroTier One.msi installer and install it. Start ZeroTier from the program menu. Then you should see the icon in the tray (where the speaker symbol is in the taskbar).

In case you don’t see it, click on the arrow next to the speaker. Then click on the icon and click Join Network ....

Enter the network’s id and click Join.

After a short time Windows should ask you whether you want your computer to be discoverable. Select Yes.

Final Step
Once you have joined the network from your host machine, don’t forget to go back to the webinterface and authorize your device. Again, I recommend you to also name it. See the screenshots from Join ZeroTier Network with RaspberryPi how to authorize and name it.
JDownloader-Docker
The JDownloader-Docker image enables you to run JDownloader and access the UI via any browser. This image has minor JDownloader preconfiguration. If you are interested in the details, check the repository. To do so, we first need to clone the repo and then build the image.
1
git clone https://github.com/MisterDerpie/jdownloader-docker
Go into the root of the directory. From there, build the image named jd2-base.
1
docker build -t jd2-base .
This process will take some time. Once it’s done, congratulations: You are now having a JDownloader base image. We will not extend the image but use it to run our container.
Create Download Directory
Create a folder in your home directory that is called jdownloader-root.
1
mkdir ~/jdownloader-root/
Go in that directory and create 2 directories, Downloads and Extracted.
1
2
mkdir Downloads
mkdir Extracted
Start JDownloader
The webinterface to JDownloader is accessible on port 8080. We can link it to any port on the Pi, yet we will use the same port. Make sure you are in the jdownloader-root directory and the directories Downloads and Extracted exist. Then, let’s start our JDownloader container.
1
2
3
4
5
6
docker container run -d \
    -p 8080:8080 \
    -v "$(pwd)/Downloads":/Downloads \
    -v "$(pwd)/Extracted":/Extracted \
    --name jdownloader \
    jd2-base
This may also take some time. Once it’s done you should see the ID of the container being printed.
What does this do?
We start the JDownloader container with the name jdownloader and link it’s Downloads and Extracted directory to the ones in ~/jdownloader-root/. As I mentioned, the image is preconfigured, so everything that is downloaded will land in Downloads. In case it’s an archive, it will be extracted to Extracted and the archives will be deleted.
Note: This container is not configured to startup on boot again. You’d have to run docker container start jdownloader after a reboot.
Connect to JDownloader
This section only works if you set up ZeroTier. Go to the ZeroTier Webinterface and find out the IP Address of the RaspberryPi.

As you can see, the IP of my RaspberryPi is 192.168.195.230. To connect to JDownloader, open <yourip>:8080/vnc.html in your browser. So in my case, I go to 192.168.195.230:8080/vnc.html. Click Connect, and there it is. We see JDownloader running and open in the browser.

Apache Webserver for File Access
We are almost good to go. Now JDownloader downloads and extracts files for us. We can also access them by accessing the Pi, but how can we access them from e.g. VLC?
I present you a very basic and rudimentary way of providing them via Docker-Apache/httpd. You will be able to access the files via browser by simply putting in the Pi’s IP address.
Note: This only works when you store all files in either Downloads or Extracted directories. In case you followed this guide, this applies.
Create index.html
To be presented with a link to your JDownloader WebUI, as well as the Downloads and Extracted folder selection on the landing page, go to ~/jdownloader-root/. There create a file called index.html and add the following content.
1
2
3
4
5
6
7
8
9
10
11
12
<!DOCTYPE html>
<head>
    <title>Server</title>
</head>
<body>
    <a href="" id="jdownloader">JDownloader</a><br/>
    <a href="./Downloads/">Downloads</a><br/>
    <a href="./Extracted/">Extracted</a>
    <script>
        document.getElementById('jdownloader').href = window.location.protocol + "//" + window.location.hostname + ":8080/vnc.html";
    </script>
</body>
Start the Webserver
Go into the ~/jdownloader-root/ directory. From there, start the webserver.
1
2
3
docker container run -d --name webserver \
    -p 80:80 \
    -v "$(pwd)":/usr/local/apache2/htdocs/ httpd
It starts on port 80 (the default port) containing the entire directory. When you go to your browser and navigate to your Pi’s IP address (in my case 192.168.195.230) you will be presented the landing page. There you can select whether you want to browse the Downloads or Extracted directory. Moreover can you also go to JDownloader directly from the landing page.
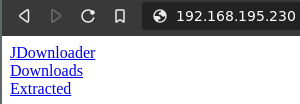
Clicking on e.g. Downloads gives you an index of the files/folders contained in it.

Bottom Line
That’s already it 🎉. You’re now running a fully remote accessible Multimedia Station on your Raspberry Pi. As mentioned, all the containers are not configured to start on the Pi’s startup. So once you reboot your RaspberryPi, you would have to run the following.
1
2
docker container start jdownloader
docker container start webserver
There are several guides available online on how to make a container start on boot. This can for example be achieved by executing docker run with the --restart=always parameter or making it a service in systemd.
Additional Content
We have JDownloader downloading and extracting, can access it from anywhere and also access the files via browser. Yet two topics should be visited to make it fully worth. The first is how we get containers & links into JDownloader. Second topic is about how to stream downloaded content in VLC.
Add DLCs or Links to JDownloader
To add links, you can use the clipboard from the sidebar. Click on the sidebar icon.
![]()
Next, open the cliboard.

Then paste your links in the clipboard. Make a right-click somewhere in the LinkGrabber field. Select Paste Links and the linkgrabber should start gathering them.

To get DLCs to JDownloader, you can simply put them in the Downloads or Extracted directory. Do so by e.g. transfer them to the Pi first (e.g. via ssh) and then open them via File -> Load Linkcontainer. The docker image additionally offers the volume /containers where you can place them in, but I didn’t use it in this post. This could be used in addition to running for instance a FileZilla container for that directory.
Stream to VLC Media Player
As many people use JDownloader to download multimedia files, it would be good having acces to them in VLC player. Open the webui. From there navigate to the file you want to stream. Make a right click on the file and copy it’s link address.

Then go to VLC and click on File -> Open Network Stream ....

Paste the link there and click on Play.
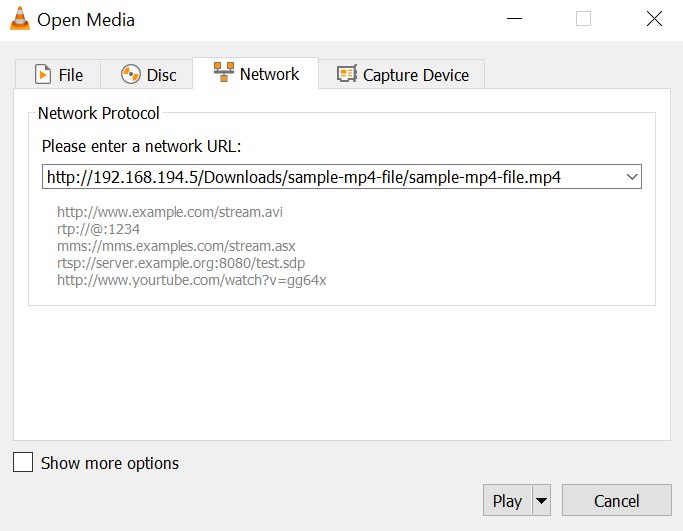
VLC should now start playing your selected video.