The sourcecode of this post is available on github/MisterDerpie/spring-boot-with-mongodb.
Foreword
For a small application to store receipts I wanted to use Spring Boot and NoSQL database MongoDB. As with many basic topics in the spring world, there is a Getting Started guide on spring.io, with the specific title “Accessing Data with MongoDB”.
Though this guide may suffice for a really straightforward start, it actually misses out two, from my point of view, essential questions.
- How to connect to a MongoDB instance?
- How to integration test MongoDB?
Therefore I wrote this post. As I want to use JavaMoney, I also cover Mongo Converters. The list explains what is covered in this post.
- Use MongoDB as a data store in Spring
- Connect to a MongoDB instance with your provided credentials
- Integration test with an embedded MongoDB
- Use JavaMoney with MongoDB
Setup MongoDB
First we need an instance of MongoDB. I will - as usual - use Docker. Therefore I assume you have docker installed, if not, there are plenty of guides how to do that available online. We use the Docker-Mongo image. To start a MongoDB instance that is running in the background, run below code from the shell.
1
2
3
4
5
6
docker container run -d \
    --name mongodb \
    -e MONGO_INITDB_ROOT_USERNAME=admin \
    -e MONGO_INITDB_ROOT_PASSWORD=admin \
    -p 27017-27019:27017-27019 \
    mongo:latest
Setup Spring Boot Project
Create Spring Project
This section is about creating the Spring project. After you created the project, don’t forget to add the additional dependencies (next section).
Create project with Spring Initializr
The easiest way to create the project is using Spring Initializr. I will use Gradle as the build automation tool, but it doesn’t matter and you can well select Maven.
We will include the 2 starters
- Lombok
- Spring Data MongoDB
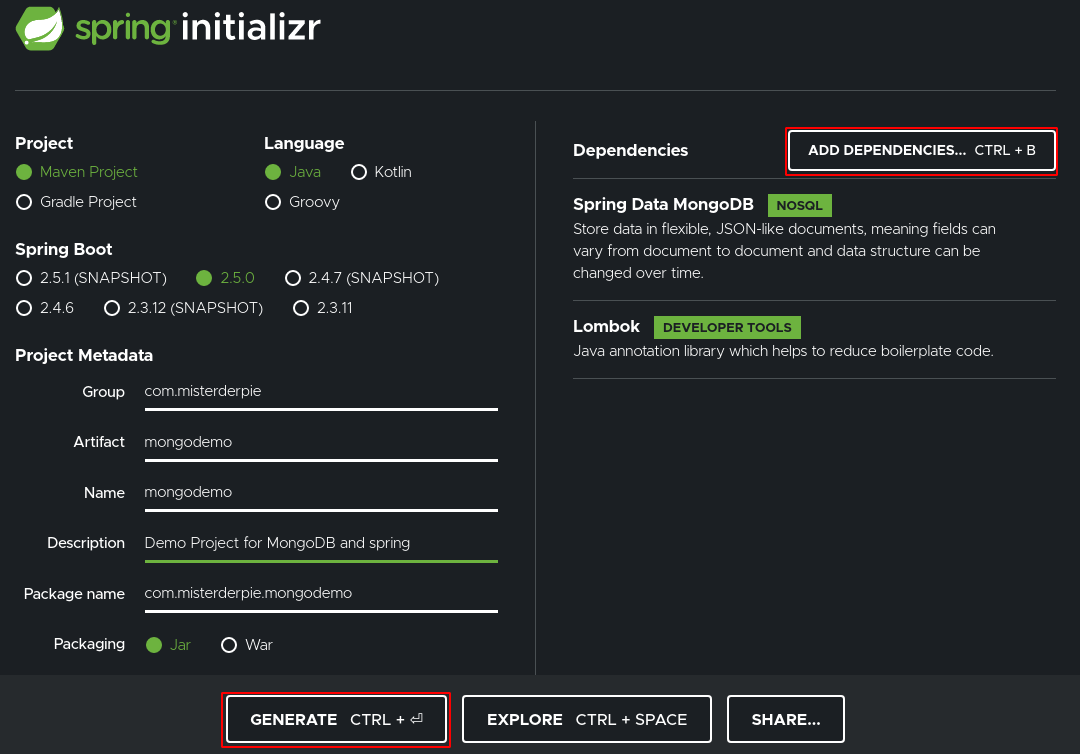
To do so, click on Add Dependencies (top right corner) and search for Spring Data Mongo DB (don’t use the reactive one) and Lombok.
Select that you want to have a Gradle Project, use Java, fill out the Project Metadata, select Packaging Jar and Java 11. Then click Generate and you should get a .zip containing your project. Unzip this anywhere and open it in the IDE of your choice. I prefer IntelliJ.
Create project with Gradle
In case you want to create your Gradle project from scratch, you can follow docs.gradle.org - Building Java Applications Sample. Add below dependencies to your dependencies block in the build.gradle file.
1
2
3
4
5
implementation 'org.springframework.boot:spring-boot-starter-data-mongodb'
implementation 'org.springframework.boot:spring-boot-starter-web'
compileOnly 'org.projectlombok:lombok'
annotationProcessor 'org.projectlombok:lombok'
testImplementation 'org.springframework.boot:spring-boot-starter-test'
Additional Dependencies
To show how to integration test and how to use JavaMoney with MongoDB, we add two dependencies, namely Flapdoodle Embedded MongoDB and JavaMoney. Add
1
2
3
testImplementation 'org.springframework.boot:spring-boot-starter-test'
testImplementation 'de.flapdoodle.embed:de.flapdoodle.embed.mongo:3.0.0'
implementation 'org.javamoney.moneta:moneta-core:1.4.2'
to your dependencies in the build.gradle file. It should then look similar to this.
1
2
3
4
5
6
7
8
dependencies {
	implementation 'org.springframework.boot:spring-boot-starter-data-mongodb'
	compileOnly 'org.projectlombok:lombok'
	annotationProcessor 'org.projectlombok:lombok'
	testImplementation 'org.springframework.boot:spring-boot-starter-test'
	testImplementation 'de.flapdoodle.embed:de.flapdoodle.embed.mongo:3.0.0'
	implementation 'org.javamoney.moneta:moneta-core:1.4.2'
}
Connect Application to MongoDB
This part only covers how to configure your application to be able to connect with MongoDB. I assume you have a MongoDB instance running configured the same way as I did with the docker image. That is, listening on port 27017, with user admin and password admin. Note that you should not use those credentials in a real application of course, but for only running this on your local machine and getting started this is perfectly fine.
In the resources folder (where the application.properties resides), create a new properties file called e.g. application-production.properties and put the following content in it.
1
2
3
4
5
6
spring.data.mongodb.authentication-database=admin
spring.data.mongodb.username=admin
spring.data.mongodb.password=admin
spring.data.mongodb.database=testdatabase
spring.data.mongodb.port=27017
spring.data.mongodb.host=localhost
This enables Spring’s MongoDB repository to
- connect to a MongoDB instance running on
localhost - with port
27017 - and username
admin - and password
admin - and selected database
testdatabase - and authentication database
admin(default in the docker container)
Why not the default application.properties?
You may wonder why we don’t use the default properties file. The reason is that the embedded MongoDB for some reason does not override these values. In case you run your integration tests without providing a profile and/or not providing these values, it would fall back to the default properties file. Thus the tests would fail, as you could not connect to the database.
For the sake of completion, before your tests even start you would see this error.
1
org.springframework.beans.factory.BeanCreationException: Error creating bean with name 'embeddedMongoServer'
Create Mongo Document in Application
The next part is to create a MongoDB document representation class. Simply put, this is the entity you are going to persist in the database. We keep it simple and want to store an Item we purchased. Its values are an id, a name and a price. We will use the id as the primary key.
Create a class called Item with the following contents.
1
2
3
4
5
6
7
8
9
10
11
12
13
14
15
16
17
18
19
import lombok.AllArgsConstructor;
import lombok.Data;
import org.javamoney.moneta.FastMoney;
import org.springframework.data.annotation.Id;
import org.springframework.data.mongodb.core.mapping.Document;

import java.util.UUID;

@Document
@AllArgsConstructor
@Data
public class Item {

    @Id
    public UUID id;
    public FastMoney price;
    public String name;

}
Let’s explain a bit what’s going on here.
@Documentindicates that we want this class to be persistable in MongoDB. In case you are familiar with JPA, this is the equivalent to@Entity.@AllArgsConstructorand@Dataare Lombok annotations. The former one creates what it states, a constructor with all parameters. With the latter we automatically create getters and setters.@Idmarks this field as the primary key to use in the database.
Use MongoRepository to access Document
The next step is that we want to store our document in the database. Spring provides a very easy to use interface for that. Just create a class called ItemRepository that extends MongoRepository<T, ID>.
1
2
3
4
5
6
7
import org.springframework.data.mongodb.repository.MongoRepository;

import java.util.UUID;

public interface ItemRepository extends MongoRepository<Item, UUID> {

}
The first generic parameter of MongoRepository indicates what entity we want to persist. As our Item is the entity, we put this there. To identify items, we set the primary key of type UUID. Therefore we put the ID type as the second generic parameter.
Integration Test MongoDB
We are done, almost. Let us test our MongoRepository whether it works as expected (hint, it doesn’t, but we will get to that).
Create the test
Create a test class ItemRepositoryTest with the following content
1
2
3
4
5
6
7
8
9
10
11
12
13
14
15
16
17
18
19
20
21
22
23
24
25
import org.javamoney.moneta.FastMoney;
import org.junit.jupiter.api.Test;
import org.springframework.beans.factory.annotation.Autowired;
import org.springframework.boot.test.autoconfigure.data.mongo.DataMongoTest;

import java.util.UUID;

import static org.assertj.core.api.Assertions.assertThat;

@DataMongoTest
public class ItemRepositoryTest {

    @Autowired
    ItemRepository itemRepository;

    @Test
    public void shouldStoreItem() {
        Item item = new Item(UUID.randomUUID(), FastMoney.of(1, "EUR"), "Test Item");
        itemRepository.save(item);
        Item storedItem = itemRepository.findById(item.getId()).orElseThrow();
        assertThat(storedItem.getId()).isEqualTo(item.getId());
        assertThat(storedItem.getPrice()).isEqualTo(item.getPrice());
        assertThat(storedItem.getName()).isEqualTo(item.getName());
    }
}
Let us look at what’s done here, before we run the test.
@DataMongoTest starts the Spring Boot Test context. In addition to that it also creates an embedded MongoDB instance.
@Autowired “injects the dependency” of ItemRepository into the test class. Simply put, Spring creates an instance of ItemRepository and puts the reference to that instance in itemRepository. So itemRepository is not null, and the creation of it is done by Spring’s Dependency Injection container. If you want to to read more about it click on the links for @Autowired and Spring Dependency Injection.
The test itself then is pretty simple. We create an Item with a random UUID, value of 1 euro and the name “Test Item”. Then we store this in the database and try to query the database for the item ID, asserting that the retrieved item is equal to the initial item.
Run the test
When we try to run the test, it will even fail before the first assertion is reached. Looking at the logs, we can see the following error.
1
2
3
Failed to instantiate org.javamoney.moneta.FastMoney using constructor NO_CONSTRUCTOR with arguments
org.springframework.data.mapping.model.MappingInstantiationException: Failed to instantiate org.javamoney.moneta.FastMoney using constructor NO_CONSTRUCTOR with arguments
...
The problem is the internal representation of FastMoney. When serialized into a JSON object, it actually does not just look like
1
{ "number": 1, "currency": "EUR" }
but like
1
{"currency":{"context":{"providerName":"java.util.Currency","empty":false},"numericCode":978,"defaultFractionDigits":2,"currencyCode":"EUR"},"number":1.00000,"precision":1,"factory":{"defaultMonetaryContext":{"fixedScale":true,"maxScale":5,"amountType":"org.javamoney.moneta.FastMoney","precision":19,"providerName":null,"empty":false},"amountType":"org.javamoney.moneta.FastMoney","maxNumber":92233720368547.75807,"minNumber":-92233720368547.75808,"maximalMonetaryContext":{"fixedScale":true,"maxScale":5,"amountType":"org.javamoney.moneta.FastMoney","precision":19,"providerName":null,"empty":false}},"context":{"fixedScale":true,"maxScale":5,"amountType":"org.javamoney.moneta.FastMoney","precision":19,"providerName":null,"empty":false},"zero":false,"positive":true,"negative":false,"negativeOrZero":false,"positiveOrZero":true,"scale":5}
But FastMoney does only have a constructor that accepts these very two parameters. The solution is to provide a custom converter, that would store our money representation exactly as what the constructor expects.
MongoDB Converter
Create Converters
To successfully save and load our Item from the database, we need to convert the price. This is done by creating a ReadingConverter and a WritingConverter. Create two classes, namely FastMoneyReadConverter and FastMoneyWriteConverter with the following contents.
1
2
3
4
5
6
7
8
9
10
11
12
13
14
15
import org.javamoney.moneta.FastMoney;
import org.springframework.core.convert.converter.Converter;
import org.springframework.data.convert.ReadingConverter;

import java.math.BigDecimal;

@ReadingConverter
public class FastMoneyReadConverter implements Converter<String, FastMoney> {

    public FastMoney convert(String input) {
        String[] storedValue = input.split("###");
        return FastMoney.of(new BigDecimal(storedValue[0]), storedValue[1]);
    }

}
1
2
3
4
5
6
7
8
9
10
11
12
import org.javamoney.moneta.FastMoney;
import org.springframework.core.convert.converter.Converter;
import org.springframework.data.convert.WritingConverter;

@WritingConverter
public class FastMoneyWriteConverter implements Converter<FastMoney, String> {

    public String convert(FastMoney input) {
        return input.getNumber() + "###" + input.getCurrency();
    }

}
Our converters implement the Converter<Input, Output> interface. The naming states exactly what we want to achieve with them. With a ReadingConverter, we want to convert when reading from the database into the Java Object. A WritingConverter is used when we write into the database from the Java Object.
What the converters do is very straightforward. We take the values from the Money, concatenate them with a placeholder of three hashtags and then save this entire string to the database. On reading from the database, we revert that operation by splitting them at the three hashtags and creating a FastMoney instance of the two obtained values.
Create Converter Config
We created our converters but need to make the MongoRepository aware of using them when storing/loading documents from MongoDB. For that, we simply create a configuration and provide a list of MongoCustomConversions.
1
2
3
4
5
6
7
8
9
10
11
12
13
14
import org.springframework.context.annotation.Bean;
import org.springframework.context.annotation.Configuration;
import org.springframework.data.mongodb.core.convert.MongoCustomConversions;

import java.util.List;

@Configuration
public class ConverterConfig {

    @Bean
    public MongoCustomConversions mongoCustomConversions() {
        return new MongoCustomConversions(List.of(new FastMoneyReadConverter(), new FastMoneyWriteConverter()));
    }
}
@Configuration loads this class in the Spring context.
@Bean tells Spring to get an instance of the return type (here: MongoCustomConversions) by calling this method. In the mongoCustomConversion method we pass a list of our converters to the constructor of MongoCustomConversions and return that.
Integration Tests Revisited
Let’s try running our integration tests again. Now that we have the converters in place, we should be good to go, right? No. Unfortunately our tests will fail for the very same reason again.
Why is that?
When running with @DataMongoTest, it does not scan for the ConverterConfig. That is why we need to include this in the Spring context in this test. This is easily done by adding @Import(ConverterConfig.class).
Our test should finally look like this and pass
1
2
3
4
5
6
7
8
9
10
11
12
13
14
15
16
17
18
19
20
21
22
23
24
25
26
import org.javamoney.moneta.FastMoney;
import org.junit.jupiter.api.Test;
import org.springframework.beans.factory.annotation.Autowired;
import org.springframework.boot.test.autoconfigure.data.mongo.DataMongoTest;
import org.springframework.context.annotation.Import;

import java.util.UUID;

import static org.assertj.core.api.Assertions.assertThat;

@DataMongoTest
@Import(ConverterConfig.class)
public class ItemRepositoryTest {

    @Autowired
    ItemRepository itemRepository;

    @Test
    public void shouldStoreItem() {
        Item item = new Item(UUID.randomUUID(), FastMoney.of(1, "EUR"), "Test Item");
        itemRepository.save(item);
        assertThat(storedItem.getId()).isEqualTo(item.getId());
        assertThat(storedItem.getPrice()).isEqualTo(item.getPrice());
        assertThat(storedItem.getName()).isEqualTo(item.getName());
    }
}
Congratulations, you successfully wired Spring with MongoDB.